- Log in to the course site.
- Locate the assignment you are marking and open it either by clicking on the link on the course homepage or via Activities > Assignments in the menu drawer.
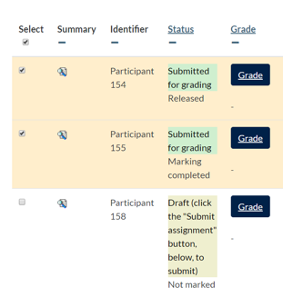
- Open the assignment, and select the Submissions tab to access the grading table showing all students and the detail of their submissions.
There are a number of ways to download assignment submissions. Here we will share step-by-step instructions for the recommended way to download submissions.
[ a video walkthrough will be added to this page soon]Whatever method you use, please make sure you only download submissions marked as Submitted for Grading. Please do not mark any submissions showing as Draft (Not submitted) or Submitted but marked as Late until your course administrator has confirmed which ones have been approved.
How do I download submissions?
- First, you can Download the gradesheet, under the Actions menu. This will be a list of all the rows in the grading table. You can edit this gradesheet to add marks for each student, and ignore any rows where no submission is available (or not ready for marking yet). This will enable you to add marks for multiple students all at once. (Feature introduced in Summer 2025)
- Select all the submissions you want to download using the check boxes in the Select column (which is located on the far left-hand side of the screen). You can use the filtring settings at the top of the screen to display only relevant submissions. For example you can use the filter to only view submissions with the status Submitted or Requires grading (you will need to untick any submissions marked as submitted late).

- As you select submissions, you will see a number of options in a sticky menu at the bottom of the screen. Select Download.
 Top tip: Before you download, check that the option to Download submissions in folders above the table is not ticked. This will ensure all the files you download have the participant number in the file name, minimising the potential for mistakes.
 - Save the zip file containing the submissions on your computer. When you unzip the file, you will notice the participant number has been added at the start of each file name.
How do I mark the assignments and provide feedback?
Assignment submissions will be saved on your computer in a zip file. The zip file will be named with the short title of the course followed by the name of the assignment.
To mark the individual assignment files:
- Double click on the zip file to open it. You will see the list of students’ assignment files named in the following format: e.g. ParticipantNumber_StudentFileName.docx (for a Word Document). Where a student has submitted multiple files, they wil be listed together.
- Open each file to add comments and feedback to each student’s assignment. Please provide feedback on the student’s assignment script, where possible; for example, by using the Comment or Track Changes features in Word, or use Comments with PDF. See the A short guide to on-screen marking for information on how to do this.
- Save the annotated script using Save as. We would suggest keeping the same name for your feedback file, followed by ‘-feedback’ for example:ParticipantNumber_StudentFileName_Feedback.docx. The first part of the file name should be the same file name as when you downloaded it initially. This will make it easier to upload the correct feedback files to each student. You can create multiple feedback files for each student. Make sure that any changes to the file name are added to the end of the file name (e.g. ParticipantNumber_StudentFileName_Feedback.docx, ParticipantNumber_StudentFileName_Feedback 2.docx, etc.)
- For each student, add the mark to the gradesheet in the Grade column.
Students may submit files in a number of different permitted file types, so in the example above .docx would be for a Word file, whereas .pdf would be a PDF file, .xlsx an Excel file and so on.
When you have finished marking, you will need to upload the annotated student script (and the feedback form if you have used one), as well as the gradesheet to the course site following the instructions below: